Tip
If you find some discrepancy or missing information - open a GitHub issue
Was this information useful? Then star the repository on GitHub
LVM
Intro
LVM is a disk-management system that adds some nice functionality in comparison to using bare partitions.
It creates a layer between the physical disks and partitions.

This allows you to:
Work around the common problem of resizing partitions that are not in the last position on the physical disk
Creation of volume snapshots
Thin-Provisioned volumes
Options to configure RAID
Implementation of write caches
More information can be found in the RedHat documentation!
Usage
Create
OS Setup
If you set-up Ubuntu or Debian you need to create your LVM-config using the graphical setup!
Once your main partitions are placed on non-LVM volumes - it is hard to move them.
It might be easier to just reinstall the machine.
Bootable
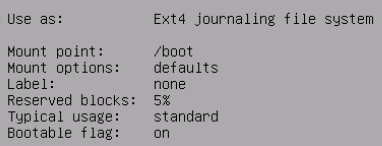
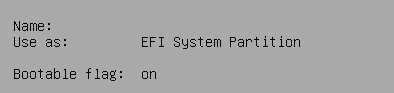
You might need to create your boot-partition ‘outside’ the LVM!
I found that EFI boot did not really work when put inside a LVM volume.
Therefor you might want to create a 512MB primary partition at the begin of your disk-layout that acts as ‘EFI bootable’ or ‘/boot’.
Example for BIOS:
Example for UEFI:
Add physical volume
Add physical volume
Make sure LVM recognized the new disk:
pvscanRemember the name of your new disk.
Create a new volume group or add the physical volume to an existing one:
# create new one
vgcreate <NAME-OF-NEW-VOLUME-GROUP> /dev/<NAME-OF-NEW-DISK>
#  example: vgcreate vg1 /dev/sdb

# add to existing one (ADVANCED USAGE)
vgextend <NAME-OF-EXISTING-VOLUME-GROUP> /dev/<NAME-OF-NEW-DISK>
#  example: vgextend vg0 /dev/sdb
Create a new logical volume - if needed:
lvcreate -n <NAME-OF-NEW-VOLUME> -L <SIZE-OF-NEW-VOLUME> <NAME-OF-VOLUME-GROUP>
#  example: lvcreate -n data -L 20G vg1
Create file-system: (‘ext4’ in this case)
mkfs.ext4 /dev/mapper/<NAME-OF-VOLUME-GROUP>-<NAME-OF-NEW-VOLUME>
#  example: mkfs.ext4 /dev/mapper/vg1-data
Mount volume:
# 1. create mount directory
mkdir -p /<PATH-TO-MOUNTPOINT>
#  example: mkdir -p /mnt/data

# 2. mount permanently
# 2.1. edit fstab-config
sudo nano /etc/fstab

# 2.2. append line
/dev/mapper/<NAME-OF-VOLUME-GROUP>-<NAME-OF-NEW-VOLUME> /<PATH-TO-MOUNTPOINT> <NAME-OF-FILESYSTEM> defaults 0 2
#  example: /dev/mapper/vg1-data /mnt/data ext4 defaults 0 2

# 2.3. save and exit
# 2.4. mount
sudo mount -a

# check if volume was mounted correctly (yes - if shown in output)
mount | grep "/<PATH-TO-MOUNTPOINT>"
#  example: mount | grep "/mnt/data"
Resize
Warning
If you don’t know what you are doing => you should not make changes like these on an important system!
You might BREAK YOU SYSTEM!!
Try it on an useless VM and play around with it or leave it to the pros.
We need to go through these steps:
Extend the physical drive or partition
1.1. Drive
You might need to resize the disk in your virtual environment/hypervisor.
1.2. Partition - entering fdisk
# start fdisk targeting the modified disk
fdisk /dev/<NAME-OF-DISK>
#  example: fdisk /dev/sdb

# show current partition layout
p
1.3. Partition - direct vs nested
Sometimes the target partition might be encapsulated inside an ‘extended’ partition.
It might look like this:
fdisk -l /dev/sda
> Device     Boot   Start      End  Sectors  Size Id Type
> /dev/sda1  *       2048   999423   997376  487M 83 Linux
> /dev/sda2       1001470 25163775 24162306 11.5G  5 Extended
> /dev/sda5       1001472 25163775 24162304 11.5G 8e Linux LVM
In that case you will have to delete and re-add both of these partitions to extend them.
# delete partition you want to extend
d
=> number of partition

# delete the extended partition
d
=> number of partition

# re-create the extended partition
n
=> choose 'extended'
e
=> enter or choose custom partition number
=> enter
=> enter

# re-create the target partition
n
=> enter
=> enter
=> remove the Signature?
n  # else your LVM config will be gone

# modify partition type
t
=> enter partition number
8e  # for LVM disk

# verify the layout is the same as before (except being bigger)
p

# save and write
w

# example:
fdisk /dev/sda
d ENTER 5 ENTER
d ENTER 2 ENTER
n ENTER e ENTER 2 ENTER ENTER ENTER
n ENTER ENTER n ENTER
t ENTER 5 ENTER 8e ENTER
w
If that is not the case it is a little easier:
# delete partition you want to extend
d
=> number of partition to increase

# re-create the partition
n
=> enter or choose custom partition number
=> enter
=> enter
=> remove the Signature?
n  # else your LVM config will be gone

# modify partition type
t
=> enter partition number
8e  # for LVM disk

# verify the layout is the same as before (except being bigger)
p

# save and write
w

# example:
fdisk /dev/sda
d ENTER 2 ENTER
n ENTER p ENTER 2 ENTER ENTER ENTER n ENTER
t ENTER 2 ENTER 8e ENTER
w
Resize the LVM physical volume
pvresize /dev/sdX
Extend the LVM volume group
vgextend vg0 /dev/sdX
Extend the LVM logical volume
lvextend /dev/vg0/lv1 -L 20GB
Update the partition size
resize2fs /dev/mapper/vg0-lv1
#!/bin/bash
PD='sda'
LVM_PV="${PD}2"
LVM_VG='vg0'
LVM_LV='lv1'
EXT='20GB'

fdisk "/dev/${PD}"
pvresize "/dev/${LVM_PV}"
vgextend "${LVM_VG}" "/dev/${LVM_PV}"
lvextend "/dev/${LVM_VG}/${LVM_LV}" -L "${EXT}"
resize2fs "/dev/mapper/${LVM_VG}-${LVM_LV}"